Introduction to Hysteresis
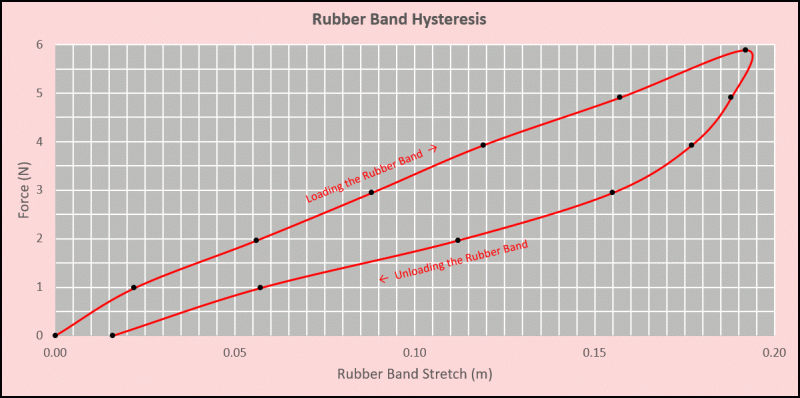
Hysteresis can be defined as a lag time in the response of a system to forces placed on the system. The response of the system depends not only on the present magnitude of the force but also on the previous history of the system. From the point of view of mathematics, the response to the force is a double-valued function. This means that one value applies when the force is increasing, while another value applies when the force is decreasing. A graphical plot of force and response will appear as a loop—often called a hysteresis loop. The area of this loop is a representation of energy lost by the system—hysteresis loss. This is typically energy that has been converted into heat.
For example, if you place a large force on a metal spoon while digging into a very cold pint of your favorite ice cream, the spoon may bend and not return to its original shape. In a broad sense of the word, the spoon has demonstrated hysteresis. The shape of the spoon depends upon its history. Many physics students first study hysteresis during their sophomore or junior year in college. They learn that magnetization curves for ferromagnetic materials do not retrace as the toroid current is increased and then decreased.
Students, however, need not wait until college to do experiments with hysteresis! This can be done by high school and AP students as well. A common method used in physics lab classes to observe hysteresis is to load and then unload masses from a suspended rubber band, while observing the extension of the rubber band. This is shown in Figure 1. Voyager is attached to the bottom of a mass hanger so that its rangefinder faces a white cardboard at the bottom of the ring stand. A clear advantage of using rubber bands to study hysteresis is that virtually everyone is familiar with them, making hysteresis less abstract than that with ferromagnetic materials.

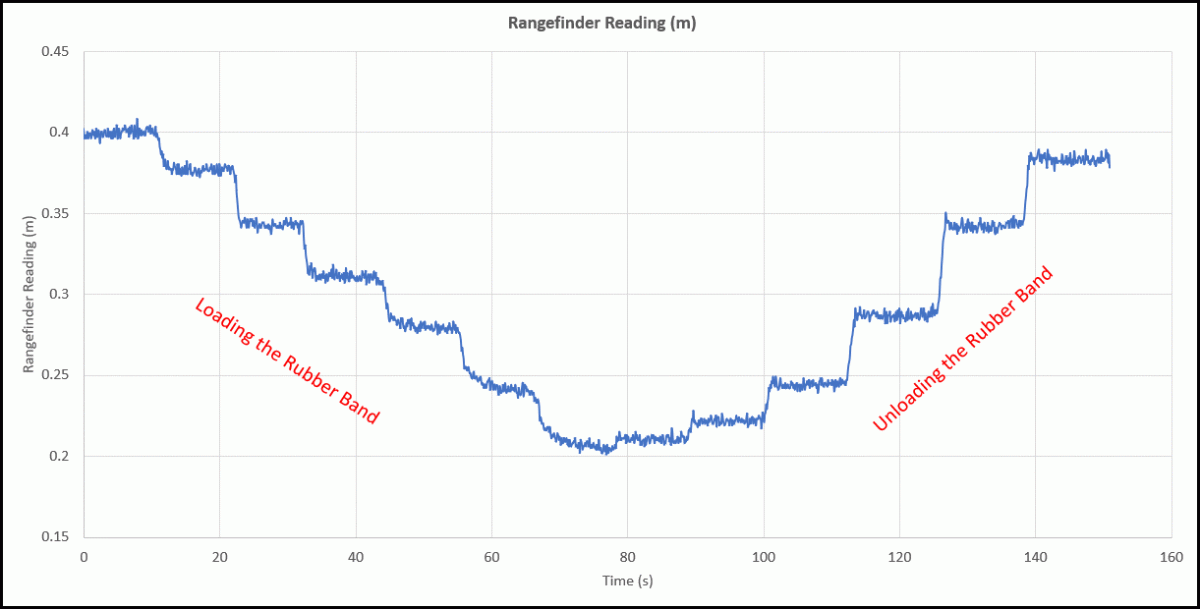
PocketLab Voyager’s rangefinder provides a perfect way to record the stretch of the rubber band. Begin with a new “never-been-stretched” rubber band. Carefully add known masses one at a time about every ten seconds and then remove them one at a time every ten seconds. Meanwhile, Voyager’s rangefinder records the amount of stretch of the rubber band throughout the process of adding and removing the masses. This is shown in Figure 2. In addition to not obeying Hooke's law, you will find that the amount of stretch of the rubber band is different when loading than when unloading.

The Goal of this Lesson
Design and carry out an experiment that will allow you to determine the hysteresis loss in Joules represented by the area of the hysteresis loop that you obtain from your investigation. Prepare a report explaining your analysis steps in this investigation. The report should include appropriate graphs and should carefully explain how your determined the loss in Joules.
Another Lesson on Hysteresis
For anyone who may be interested, the author of this lesson has published another lesson dealing with hysteresis. This lesson can be found by clicking on this link: Hysteresis of a Tactile Sensor.

