A Tactile Sensor ON/OFF ScratchX Switch
This lesson provides an example of how to ScratchX program PocketLab Voyager's tactile sensor as an ON/OFF switch. If you have a device such as a light bulb, motor, or robot that is under control of ScratchX, then the code in this lesson may be a starting point for you. The ScratchX program assumes that the device can be in any one of two possible states, which we will call ON and OFF.
Figure 1 shows the setup for this lesson. The tactile sensor has been attached to Voyager. A small piece of removable double sided tape keeps the tactile sensor flat and stationary. The ScratchX stage has two overlapping images. One of the images is of a light bulb turned off, and the other image is of the light bulb turned on. Figure 1 shows the image with the light bulb turned off, which is the state the light is in when the main program is started.
Action Video for this Lesson
The video shown below shows the ScratchX program of this lesson in action. Alternate presses of the tactile sensor change the state of the light from OFF to ON (or from ON to OFF).
The ScratchX Program
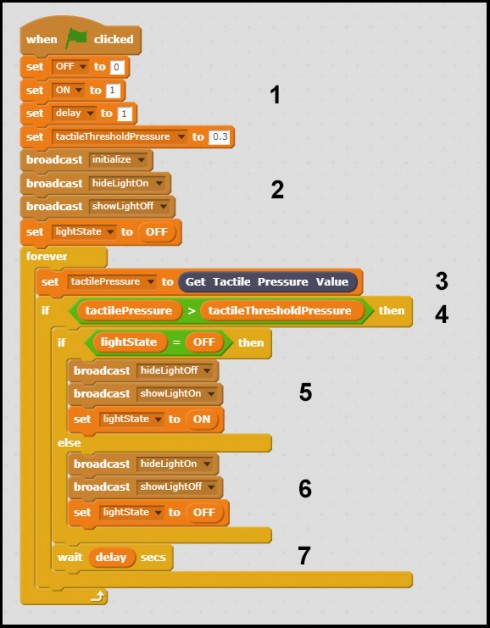
Figure 2 shows the main ScratchX program code for this lesson.
Constants are defined in block group #1. To improve self-documentation, the variable OFF is used for 0 and variable ON is used for 1. The variable called delay is the minimum allowed time (in seconds) between recognizable presses of the tactile sensor. Times less than this have no effect on the state of the light. The variable tactileThresholdPressure is the minimum tactile pressure (in AU-arbitrary units) that will cause a change in state of the light.

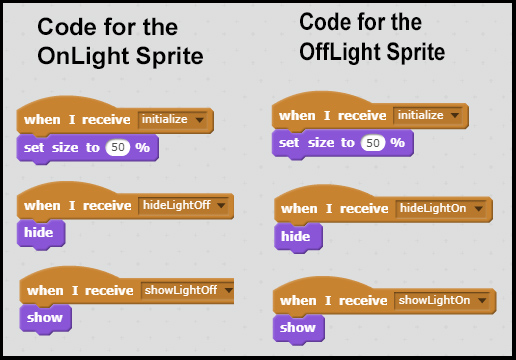
Block group #2 broadcasts appropriate messages to the "OffLight" and "OnLight" sprites. The code for these sprites is shown in Figure 3. The message initialize simply sets the size of the images to 50% so that they will fit nicely in the Scratch stage. As you would expect, the hideLightOff and hideLightOn messages hide the appropriate of the two images when needed. Similarly, the showLightOff and showLightOn messages show the appropriate of the two images when needed.

The forever block begins by getting the tactile pressure reading from the PocketLab sensor. It then checks to see if the sensor reading is greater than the threshold tactile pressure. If so, and the current state of the light is OFF, then block group #5 turns the light on. If the current state of the light is ON, then block group #6 turns the light off. Block #7 then requires a delay time of delay seconds before another press of the tactile sensor will be recognized. What will happen if the threshold tactile pressure is set to zero?
Click this link for information on using ScratchX with PocketLab.
